Concrete garden paving slabs offer durable, affordable options for creating charming, low-maintenance walkways and decorative pathways. This guide highlights five concrete mold sets that help you cast your own stepping stones and tiles, with clear picks for different garden styles and budgets. It’s ideal for DIY homeowners, weekend hobbyists, and garden designers seeking repeatable, high-impact results. Read on to compare what each product brings to your project, who it’s best for, and any practical caveats.
Summary table of chosen products:
| Product | Best For | Key Benefit | Best Use |
|---|---|---|---|
| Betonex Log Slab Old Wood Paver | Rustic, woodland or cottage gardens | Imitates cut wood for natural charm | Pathways, stepping stones, garden borders |
| Betonex Grass Block Paver Mold | Modern, low-maintenance lawns and walkways | Grass-block look with easy drainage | Permeable garden paths |
| Betonex Chestnut Pathmaker Mold | Large, bold patio slabs | Big, beautiful deck-like stones | Patio floors and expansive walkways |
| Betonex Cobweb Cobblestone Mold | Classic cobblestone aesthetics | Traditional look with repeatable texture | Historic-inspired paths |
| CJGQ 20″x20″ Walk Maker (8-Grid) | Customizable, continuous paths | Large-grid, reusable for varied layouts | Garden paths and yard routes |
Betonex Log Slab Old Wood Paver Mold
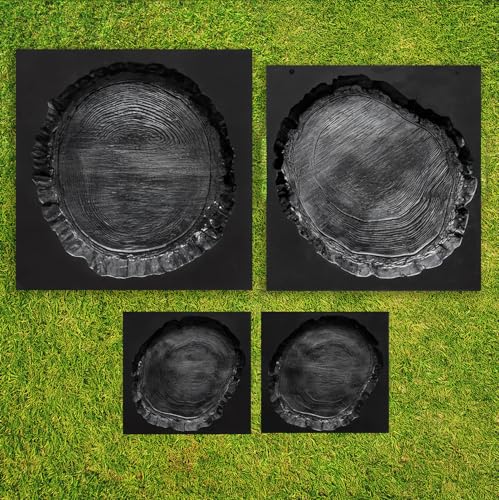
This set includes four log-slab molds designed to mimic cut wood with a natural, rustic appearance. The molds are intended for casting plaster or concrete, allowing you to produce stepping stones and garden tiles that blend with woodland or cottage garden themes. The included notes emphasize DIY usability and reuse, appealing to beginners and seasoned crafters alike who want custom pavers without purchasing pre-made stones.
Who this is best for: homeowners aiming for a natural, wooden-look pathway in a low-maintenance garden. Why selected: the four-piece set provides a compact, economical way to build a winding path with repeated modules that resemble weathered timber. Caution: ensure release agents and curing conditions match the plaster or concrete mixture to minimize sticking and warping.
Betonex Concrete Molds Grass Block Pavers Mold

This mold pack focuses on grass-block style pavers that fit seamlessly into lawn or garden edges while allowing drainage through the gaps. The data highlight a 0.24 square meter footprint per mold and a compact size suitable for creating a permeable pathway that still looks polished. It’s an appealing choice for green-thumb homeowners who want a semi-natural look with practical water management.
Who this is best for: gardeners seeking a green, permeable path that reduces runoff. Why selected: the grass-block aesthetic stands out as both decorative and functional, helping you combine walkway design with lawn integration. Limitation: ensure your concrete mix and curing times don’t fill the grass gaps too completely, which could reduce the intended look.
Betonex Chestnut Pathmaker Mold

Designed to produce large, chestnut-like paving slabs, this single-piece pathmaker mold yields a striking, bold statement for patios and expansive walkways. The mold’s dimensions create a generous footprint, enabling fewer joints and a more seamless surface. It’s best for larger projects where a dramatic, uniform slab is desirable and where you want a fast, repeatable production process.
Who this is best for: homeowners planning a sizable patio or broad entry path with a strong visual impact. Why selected: the large format minimizes joint lines and creates a modern, cohesive look. Limitation: a larger mold means you’ll need ample space and sturdy release techniques to prevent sticking or warping during demolding.
Betonex Cobblestone Pathmaker Mold Set

This four-mold set reproduces a classic cobblestone texture, suitable for traditional garden paths or a vintage-inspired courtyard. Its repeating pattern supports scalable path layouts and can be used to craft a continuous, old-world aesthetic. The packaging emphasizes DIY versatility and a broad surface area for tile production, making it a solid pick for larger yard projects.
Who this is best for: design-focused buyers seeking a timeless cobblestone feel. Why selected: the set’s texture and scale pair well with brickwork, gravel, or manicured lawn borders. Caution: cobblestone textures can be busy; plan path width and joint alignment to avoid visual clutter in smaller spaces.
CJGQ 20×20 Path Maker (8-Grid)

This CJGQ model provides an 8-grid layout suitable for building long, continuous walkways. It’s made from polypropylene for durability and is marketed as easy to use by homeowners without professional tools. The 20″ x 20″ footprint supports modular expansion for a cohesive garden path, with focus on straightforward demolding and reuse.
Who this is best for: DIYers who want flexible, repeatable path designs with scalable layouts. Why selected: the grid-based approach makes it easy to plan and adjust paths as you go, and the material is noted for reuse. Limitation: grid joints can appear where the path turns sharply; consider layout planning to minimize visible seams.
CJGQ Walk Path Maker 10-Grid

This CJGQ model offers a larger, 10-grid layout for customizable walkways around the yard. The materials are described as reusable polypropylene, designed for simple demolding and cleaning. The grid system supports varied path widths and shapes, allowing you to adapt to curved garden borders while maintaining a cohesive look.
Who this is best for: homeowners who want a blend of modular flexibility and larger-format tiles. Why selected: the 10-grid option provides more layout options per mold set, helping you craft complex pathways. Limitation: large tiles require stable support during setting to avoid sagging when poured or cured in uneven ground.
Betonex Parquet Patio Paving Mold

This mold set emphasizes a parquet-style surface, offering a bigger, decorative surface area for patios with a refined, modern finish. The single-piece mold is designed to yield a large, smooth slab with a parquet texture, ideal for contemporary garden spaces that prioritize clean lines and minimal grout lines. It’s a strong option for homeowners pursuing an elegant outdoor living area.
Who this is best for: designers and homeowners seeking a high-end, seamless patio look. Why selected: parquet texture provides visual interest without heavy joints, producing a polished patio surface. Caution: ensure proper alignment and curing to prevent edge chipping and to maintain the smooth parquet finish across multiple pours.
Buying Guide: Concrete Garden Paving Slabs
What should you consider when choosing concrete molds for garden paths and patios?
- Path width and layout: Choose grid-based molds when you plan long, continuous paths; select large, single-piece slabs for broad, statement patios.
- Texture and aesthetics: Wooden, grass-block, cobblestone, and parquet textures create different styles. Match texture to your garden theme and neighbor landscaping.
- Durability and reuse: Polypropylene and ABS molds are common for reuse. Consider ease of release, cleaning, and storage after curing.
- Drainage and permeability: Grass blocks and permeable designs help manage rainfall and reduce runoff; factor local climate and soil type.
- Size and space requirements: Bigger slabs reduce joint lines but demand more space for curing and demolding; plan workspace accordingly.
- Maintenance: Some textures hide stains and wear better than others. Consider how you’ll clean and seal your finished slabs if desired.
Practical steps for using concrete molds
- Prepare a flat, level area and secure the mold edges to prevent movement during pouring.
- Use a release agent to minimize sticking and extend mold life.
- Mix concrete or plaster to a workable consistency; avoid overly wet mixtures that can sag or separate.
- Fill in layers, tapping lightly to remove air pockets, and smooth the surface for a uniform finish.
- Allow sufficient curing time before demolding, then cure slabs in a stable, shaded area to reduce cracking.
Layout tips
- Plan module placement on graph paper or a simple layout app before pouring.
- Test-fit stones dry to visualize spacing and alignment with borders, plantings, or edging.
- Consider alternating textures or sizes to create visual interest without sacrificing practicality.
Maintenance and longevity
- Sealants can extend life and improve stain resistance on decorative slabs; verify compatibility with your mold material and concrete mix.
- Repair small chips with patching cement; replace severely warped sections if needed for safety and aesthetics.
- Keep slabs clear of plant roots that could cause uplift; consider edging to protect joints.
FAQ
- Q: Are these molds suitable for outdoor use in cold climates? A: Yes, but use weather-appropriate concrete mix and allow longer curing times in cooler temperatures.
- Q: Can I pour directly onto soil or grass? A: It’s better to prepare a compacted base (gravel or sand) to ensure stability and prevent cracking.
- Q: How many slabs can I expect from a typical mold set? A: It varies by mold size and thickness; most sets support numerous pours before wear becomes noticeable.
- Q: Do these molds require special tools? A: No professional tools are required; basic mixing and troweling are sufficient for most projects.
- Q: How do I clean the molds after use? A: Rinse with water, scrub as needed, and dry before storing to prevent material buildup.
- Q: Is sealing necessary for all finishes? A: Sealing is optional and depends on desired finish and local climate; some textures benefit from sealants for stain resistance.